How to Seal Gaps Around Windows to Save Energy
Last winter, I was curled up on my favorite chair with a hot mug of tea, feeling pretty settled in for the evening—until I noticed a chill sweeping across my feet. Persistent, low, and completely indifferent to the extra blanket I threw over my legs. I checked the window. Looked fine. Felt fine from a foot away. But once I pressed my hand to the frame, there it was: a slow, steady leak of cold air. I’d been heating my apartment for months with a gap the size of a thumbnail quietly undoing all of it. That’s when I started figuring out how to seal gaps around windows to save energy—not because I wanted a project, but because I was tired of paying for heat that went straight outside.
Why Sealing Window Gaps Helps You Save Energy
I’ll be honest—when I first looked into this, I was half-expecting it to be one of those things that sounds simple but turns into a two-weekend nightmare. It wasn’t. The actual sealing part is manageable. What no one really tells you is that the payoff isn’t always dramatic. My living room got noticeably better. My hallway is still stubbornly cold if the wind is coming from the north—and I’ve accepted that some battles aren’t worth fighting.
Still, the difference on energy bills is real. Your furnace isn’t working as hard, the warm air you paid for stays put longer, and the room just feels less hostile in January. It’s not glamorous work, but it’s the kind of thing that pays you back quietly, every single month. If you’ve been putting it off, it’s worth an afternoon.

How to Identify Air Leaks
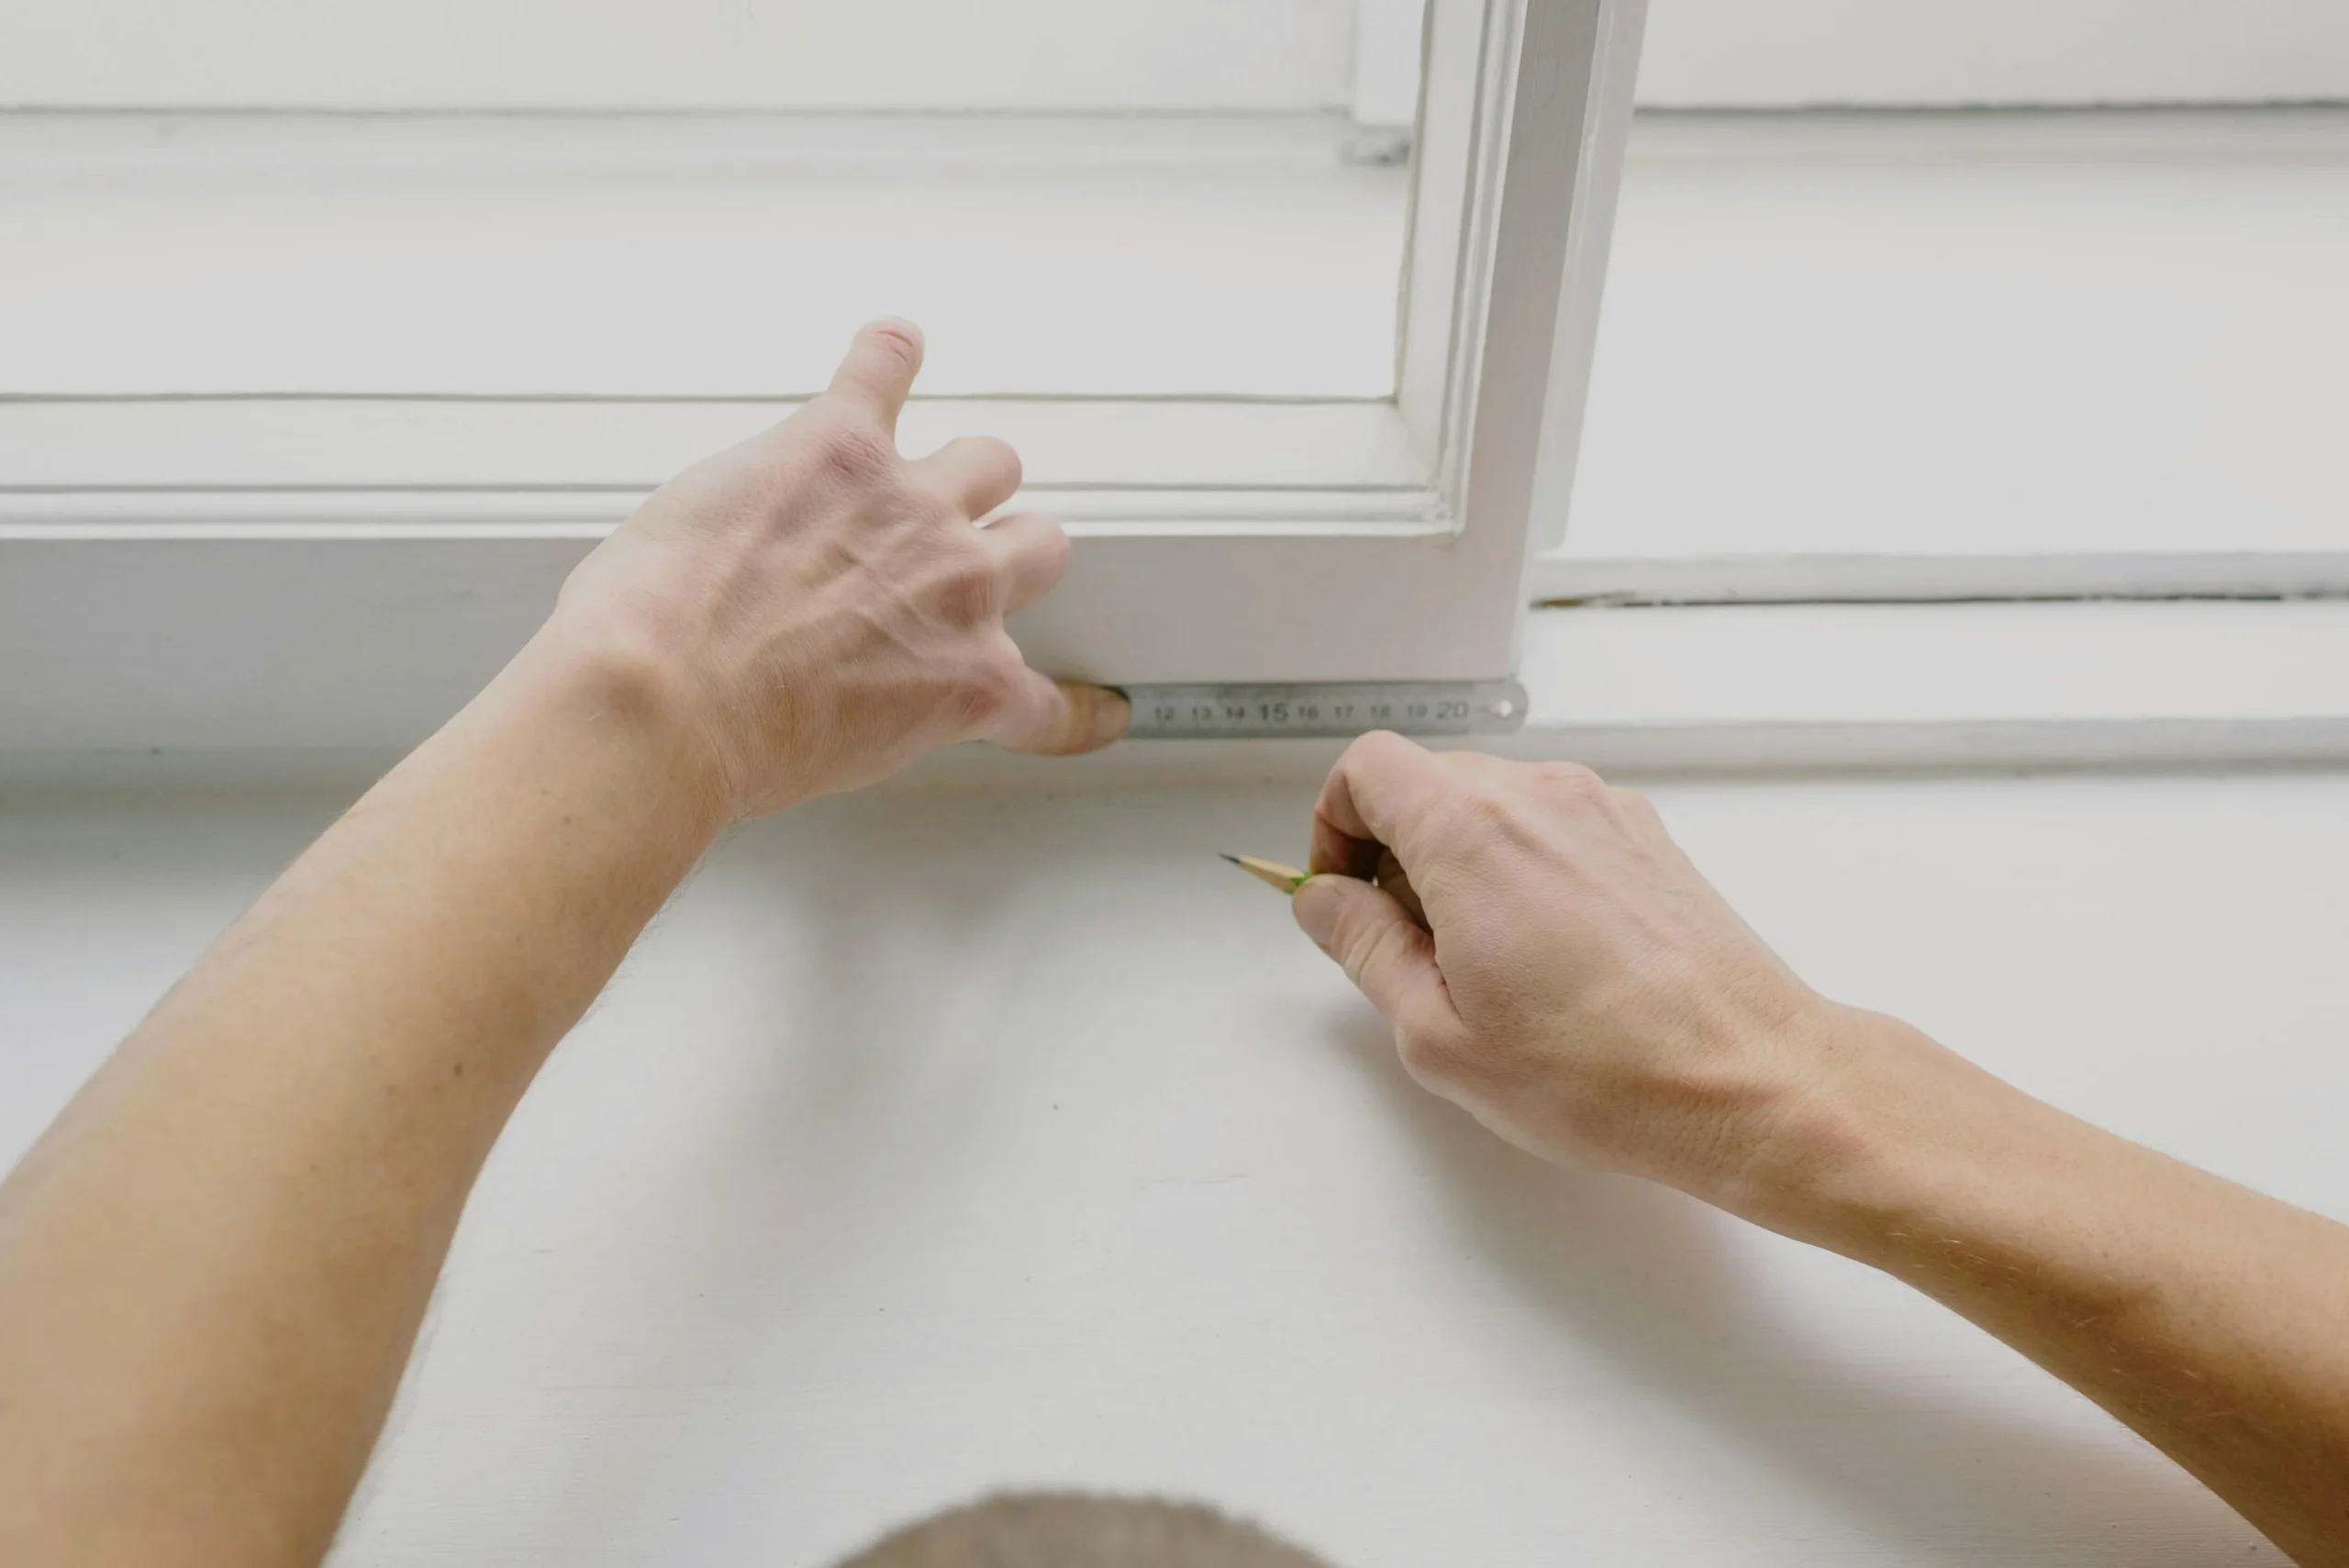
Before anything else, you need to find where the cold is actually getting in. This sounds obvious, but I spent an embarrassing amount of time sealing the wrong spots on my first pass.
- Hand test: On a windy day, move your hand slowly around the window frame. You’re feeling for temperature changes, not full-on gusts—the sneaky leaks are subtle.
- Incense or candle method: Light a stick of incense or a candle and move it along the seams and edges. If the smoke wavers or bends, you’ve found something. Mark it with a pencil right away, because you’ll forget.
- Check the obvious trouble spots first: Where the frame meets the wall, along the sash, and at movable joints. These are almost always the culprits.
One thing I’ll add: do this on a genuinely cold, windy day. I tried it on a mild afternoon once and found nothing. Two weeks later in a cold snap, I discovered three gaps I’d completely missed.
Materials Needed for Sealing Window Gaps
Get everything together before you start. I made the mistake of beginning with half a roll of weatherstripping and no backup, and ended up doing one window properly and leaving the rest for “later” (which turned into three weeks later). Here’s what you actually need:
- Weatherstripping (foam tape, V-strip, or felt) — for moving parts like sashes
- Silicone caulk — for the fixed gaps between the frame and wall; get paintable and flexible
- Window insulation film — worth it for older, single-pane windows
- Draft stoppers — simple fabric tubes for the sill, last line of defense
Nothing exotic. Most hardware stores carry all of it in one aisle.
Step-by-Step: How to Seal Gaps Around Windows to Save Energy
Step 1: Clean the Surfaces
I skipped this the first time. Big mistake. I pressed new weatherstripping directly over a layer of old, crumbling caulk, and within a week it was peeling at the corners and letting air in again. You have to start clean.
Scrape off the old caulk and weatherstripping with a putty knife—not a kitchen knife, which I also tried, and which left scratches I’m still annoyed about. Wash the frames with warm soapy water, get into the corners, and then let everything dry completely before touching a single adhesive. It’s tedious and not remotely satisfying, but it’s the difference between a seal that lasts a season and one that lasts three years.
Step 2: Weatherstripping
Measure the sash, cut your foam tape or V-strip to length, peel the backing a few inches at a time, and press it firmly along the track. The corners are fiddly—give them extra pressure and don’t rush.
My first attempt ended with the window slightly stuck. I’d pressed the foam in too thick and it was catching on the sash every time I tried to open it. I had to peel it back and reposition. The fix: test the window every few steps, before the adhesive fully sets, so you can adjust without destroying the strip.
Once it’s right, the window closes with a noticeably snugger feel. Not dramatic, but you’ll notice it.
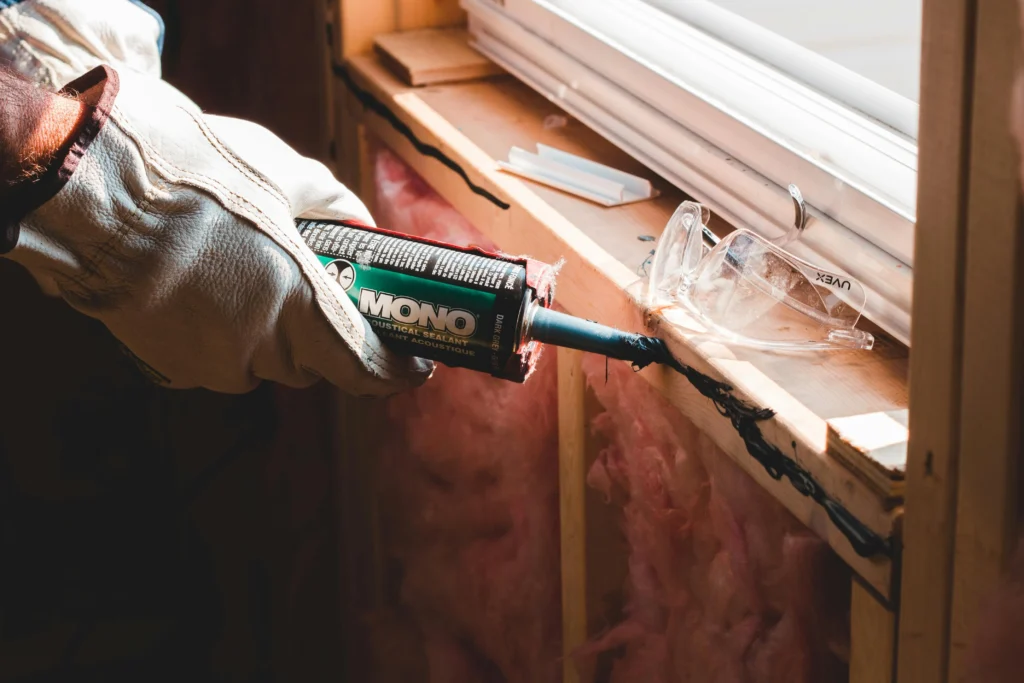
Step 3: Caulking
Load the tube into your caulking gun, cut the nozzle at a 45-degree angle—make the hole smaller than you think you need, you can always widen it—and run a slow, continuous bead along the seam where the frame meets the wall.
My first line looked like I’d done it with my eyes closed. Wobbly, uneven, with a blob at the start where I hesitated. Smoothing it with a damp finger helps a lot: press it into the gap and drag slowly. Keep a damp rag nearby for the excess.
It gets better with each window. By the third one, I actually had a passable technique. Don’t expect perfection on the first pass—just make sure the gap is covered and the seal is continuous.
Step 4: Window Insulation Film
This one felt ridiculous when I first tried it. You’re essentially shrink-wrapping your window with a hair dryer.
Stick the double-sided tape around the inside of the frame, stretch the clear film across it, then run a hair dryer over the surface. The film tightens and the wrinkles disappear. It does work—the room felt quieter and noticeably less drafty. The problem is the corners. Mine started lifting after about six weeks, and re-sticking them was a minor recurring annoyance for the rest of winter. It’s not a permanent solution, but as a seasonal fix for older windows, it earns its keep.
Step 5: Add Draft Stoppers
Draft stoppers are the least elegant part of this whole process, but they have their place. A rolled-up old fleece scarf wedged along the bottom sill is not a sophisticated fix—but on a night when the wind is coming straight at the window, it makes a difference.
You can buy proper ones or make them from scrap fabric filled with rice or dried beans. Either way, they’re best used as backup, not as a primary solution. If you’re still getting cold air after steps 1 through 4, a draft stopper catches what the rest missed.
Additional Weatherization Tips
- Thermal curtains: Heavy, insulated curtains make a real difference on cold nights. Open them during the day to let sun in, close them at dusk to hold the warmth.
- Insulated shades: Cellular or honeycomb blinds add a layer of insulation without blocking light the way curtains do.
- Annual check: Do a quick inspection every autumn before it gets cold. Caulk cracks, weatherstripping compresses and wears out—a 20-minute check can catch problems before they cost you all winter.
FAQ
How do I check for air leaks around my windows? Use your hand on a windy day, or run an incense stick or candle slowly along the frame seams. Any flicker or movement in the smoke is a leak worth marking.
What’s the difference between weatherization and draft proofing? Weatherization is the broad term for anything that improves your home’s energy efficiency—insulation, window coverings, sealing. Draft proofing is the specific act of blocking air leaks in windows and doors.
Does sealing window gaps really reduce heat loss? Yes. Gaps around windows are one of the main sources of heat loss in most homes. Sealing them keeps warm air in during winter and cool air in during summer, and it reduces how hard your heating and cooling systems have to work.
Can I hire a professional for air leak detection? Yes—energy auditors use blower door tests and thermal cameras to find leaks you’d never spot yourself. Worth it for older homes or if DIY efforts aren’t cutting it.
How often should I reseal windows or replace weatherstripping? Check once a year. Caulk and weatherstripping wear out faster than you’d expect, especially with temperature swings and heavy window use.
Will sealing gaps help with sound reduction? Yes, as a side effect. Sealing air leaks also blocks outside noise, which is a nice bonus if you’re near a street.
Does sealing all gaps affect indoor air quality? It can, if you seal everything and never ventilate. Keep a window cracked occasionally, run exhaust fans in the kitchen and bathroom, and you won’t have an issue.
Enjoy the Benefits of Sealing Window Gaps
There’s no single afternoon of weatherizing that transforms a drafty house into a perfectly sealed one—at least, that’s not how it went for me. What I ended up with was a noticeably warmer living room, a slightly more cooperative hallway, and a heating bill that stopped climbing every January. The work sticks around: every autumn I do a quick check, touch up whatever’s worn out, and the improvements carry forward.
It’s not a dramatic project. But it’s one of the few home fixes where the results show up on your utility bill month after month. That’s enough reason to do it properly.